


UPPER CANDEL BLOCKS
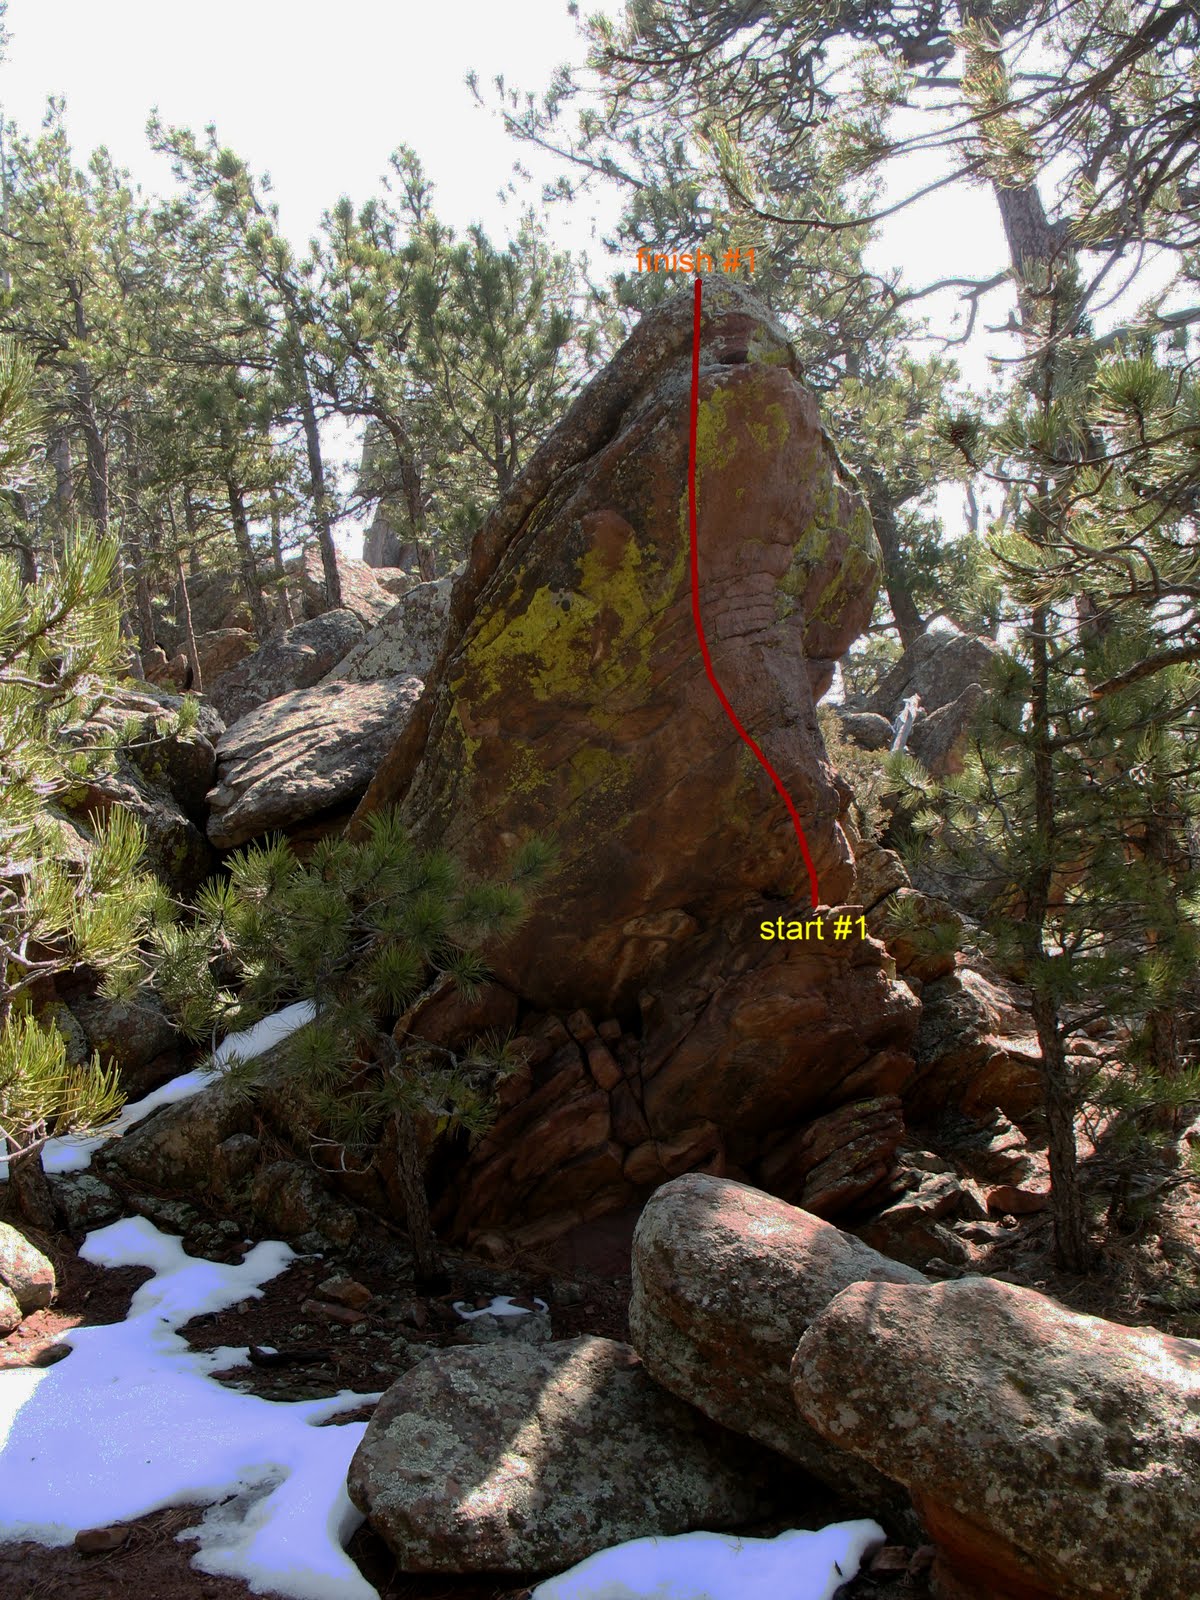
1. Toadstool VB sds ... FA: Unknown
This problem is located on by itself on the north side of chossy little boulder at the top of the short hill just before the tightly-knit pine trees. From a sds on the northwest side, climb the flaky northwest bulge up mostly jugs.
2. First Move VB ... FA: Unknown
Climb the short and easy northeast corner to the top.
3. Second Move V1 ... FA: Chip Phillips, 2002
Right of #2, begin on really poor starting holds (lots of pebbly-grips and a couple of slopey options), put a foot on a ledge and lunge straight up from from those same really poor holds to the incut lip and mantel it out.
4. Third Move V2 ... FA: Chip Phillips, 2002
Right of #3, ascend the west-pointing arête. Without using the small meddling boulders below to get started, do an awkward first move to start using a good RH on the arête and a really poor LH and continue to the top with a possible mantel finish.
5. Rabbit Hole V4 / V5 sds ... FA: Peter Jones, early 2000's
Find the arête with a boulder perched above it. Begin on good edges on the arête (a) or a sds below (b) and surf up and left on slopers until you can transition up onto the slabby east face of the upper boulder and go to the top.
6. Chess Board Left V0 sds ... FA: Peter Jones, early 2000's
Begin from a sds on two low holds. With good feet, surf the lip up and right to the apex of the boulder and pull over on jugs.
7. Chess Board Center V0 sds ... FA: Peter Jones, early 2000's
Begin from a sds on a thin LH sidepull and RH jug. Bump your LH up once or twice to better holds and pull over the top. Variation #1 - Jones Opening V? sds: A variation to #7 that uses the same LH sidepull and a opposing thin RH sidepull instead of the jug to start, which probably necessitates a high right heel-hook to start. A crouching start will be necessary unless you are tall with long arms or you have 2 or 3 pads to stack so you can reach the RH crimp from the sitting position.
8. Chess Board Right V0 sds ... FA: Peter Jones, early 2000's
Begin from a sds down low on the arête and make a few pulls up and left on good incuts to pull over the top.
9. Brickmason Traverse V2 sds ... FA: Peter Jones, early 2000's *
About 10 yards past #6-8 is a narrow north-to-south corridor with a slightly overhanging west face that almost appears to be the work of a brickmason. Start at the southern end and traverse uphill right to left up silky-smooth reddish bricks to the highpoint where you can topout on jugs. A cool traverse on unique rock.
BACKSCRATCHER CORRIDOR
10. Backscratcher V2 sds ... FA: Chip Phillips, 2002
From the above problems, backtrack out of the little boulders into the tightly-knit pine trees and walk south 20 yards. This corridor is located one level below and west of the Fingers Boulder Corridor. With a jagged-limbed bush right behind you and ready to impale you if you fall, ascend this west-facing bulge to the top from a sds.
11. Backscratcher Crack VB ... FA: Unknown
Five feet right of #11, climb out the obvious wide crack that is almost a chimney.
FINGERS BOULDER CORRIDOR
12. Rounded Prow VB ... FA: Unknown
Twenty yards before you arrive at the Fingers Boulders proper, look for a tall rounded prow. Climb straight up it on sloping high-friction sloping edges.
13. Sloping Jugs VB ... FA: Unknown
Eight feet right of #12, climb large sloping high-frcition jugs just left of a large tree.
14. Finger Arête V2 (a) / V4 sds (b) ... FA: Unknown *
The name is a misnomer, as this is not an arête problem. Start on opposing layaways (a) and climb the short face left of #15. A sds begins below on opposing sidepulls (b) and bumps the grade.
15. Fingers Fingers V1/2 sds ... FA: Unknown
Climb the short finger crack from a sds at the base of the crack to good holds at the top.
16. Right Finger V3 ... FA: Unknown
A few feet right of #15, pull on at the thin finger-slicing edge, slide left a couple feet and topout over the bulge.
17. Right Finger Direct V7 sds ... FA: Justin Jaeger, 2003 *
From an obvious sds 8 feet right of the crack at a jug below the start for #16, move up into #16 via a match on or crossover from a thin finger edge. At first glance, this one appears deceivingly easier than advertised.
18. Finger Free V3 ... FA: Peter Jones, early 2000's
Around to the right from #16 and #17, traverse the somewhat lichenous arête/lip to the left for about 12 feet, then top out where #16 and #17 do.
HUECO HANG
19. Hueco Hang Left V0 ... FA: Unknown
No hueco's here, although there are some on the overhang looming above. Surmount the short bulge up to a ledge at the vertical crack.
20. Hueco Hang Right V2 ... FA: Unknown
No hueco's here either. About 15 feet right of #19 and just right of a small leaning pine tree, surmount a bulge up onto a ledge.
THE RAMP
21. The Ramp V1 ... FA: Rob Candelaria, 1974 *
A contender for the best slab problem on the mountain! Ascend the slick low-angled grey slab just left of The Jug for about 24 feet using pebbles, pockets and thin edges. When you arrive at a bit of a stance with good hands, step right onto a ledge behind the topout for The Jug problems.
THE JUG
22. Legacy of the Kid V4 ... FA: Rob Candelaria, 1974 *
Just right of #21, climb the vertical left side of the red streak to huge incut edges. Continue straight up the left side of the high prow on good holds, then exit transition onto the top via miniscule crimps and an armyman-crawl topout at 24 feet. This one is very committting on thin topout holds with little chance for retreat. At a minimum, I highly recommend scoping out the topout first. Bravo Rob!
23. Red Streak V1 ... FA: Rob Candelaria, 1974 *
Climb the right side of the red streak to the incut edges, then go up and right on enormous jugs to top out with #24.
24. Right Red V0 ... FA: Rob Candelaria, 1974 *
Start a few feet right of #23, but finish on the same holds. Almost as fun and good as its neighbor.
25. Southwest Prow V1/2 X ... FA: Unknown
Start at a large undercling down in a hole at the base of the southwest corner about 10 feet right of #24. Do a couple of hardish moves to get started, then climb the line of least resistance 25+ feet up the low-angled prow to the top. A couple of spots will force you to think and it's along way down to the talus, but it's all there and the very top is quite juggy.
26. Southwest Face V1 X ... FA: Rob Candelaria, 1974
Twelve feet right of #25 up on top of a platform of sorts, this low-angle problem ascends pebbles, edges and pockets amongst the lichen for 20+ feet above a slot and talus block landing. There are lots of different ways one could climb this slab, although there is a fairly direct line to the top in the middle.
MUFFET ROCK
27. Muffet Rock Traverse V1 sds ... FA: Unknown *
Begin from a sds low on the right and traverse up and left for 15+ feet. At that point, go to the top on huecos and edges. There is a large 1000 lb teetering block 15 feet up and right from the start of this problem, so stay the hell away from it on the descent.
28. Muffet Rock Direct V1 sds ... FA: Unknown
Begin from a sds with #27, but after about 5 feet ascend two bulges to the top at an obvious weakness. There is a large 1000 lb teetering block 15 feet up and right from the start of this problem, so stay the hell away from it on the descent.
SUNSHINE SLAB
29. Bush Route V0 X ... FA: Unknown
Left of #31 about 10 feet, climb straight to the high ledge 40+ feet up passing a ledge and a small dead tree on your left.
30. Reverse Inner Earth Traverse V1/2 ... FA: Rob Candelaria, 1975
Traverse left to right across the length of the Sunshine Slab, finishing up #36 or at the far right hand end of the wall.
31. Aerial Ballet V0 X ... FA: Unknown *
Start up a well-featured section of holds to a stance, then venture up small pebbles and edges to the high ledge 40 feet up. If you like committing slabs, this finishing sequence is for you. See also the next 4 problems.
32. Difficult Route V2 X ... FA: Rob Candelaria, 1974
A few feet right of #31, climb gently up the face to the high ledge 40 feet up using edges and pebbles that may be difficult to trust.
33. Michael’s Face V2 X ... FA: Jim Michael, 1975
Ascend the line that begins directly behind the tree and climbs straight to the high ledge 40 feet up.
34. Ament Face V2 X ... FA: Pat Ament, 1975
Just right of the tree and #33, climb straight to the high ledge 40 feet up.
35. Aesthetic Face V1 X ... FA: Unknown
A few feet right of the tree, climb straight to the high ledge 40 feet up.
36. Nubbin Wall V0 ... FA: Unknown *
Climb solid pebbles and nubbins up to a small ledge 15+ feet up. Now downclimb the problem, although it is also possible to traverse right and head down there.
37. Inner Earth Traverse V2 / V2 X ... FA: Rob Candelaria, 1975
Traverse right to left across the entire length of the Sunshine Slab. Stop at the end or head for the top with #29.
PROW ROCK
38. Prow Overhang V4 sds ... FA: Unknown *
From a low sds on the north corner of the boulder, use closely-spaced crimpers to bump your way up to the top of the prow and pull over. Short, but otherwise perfect.
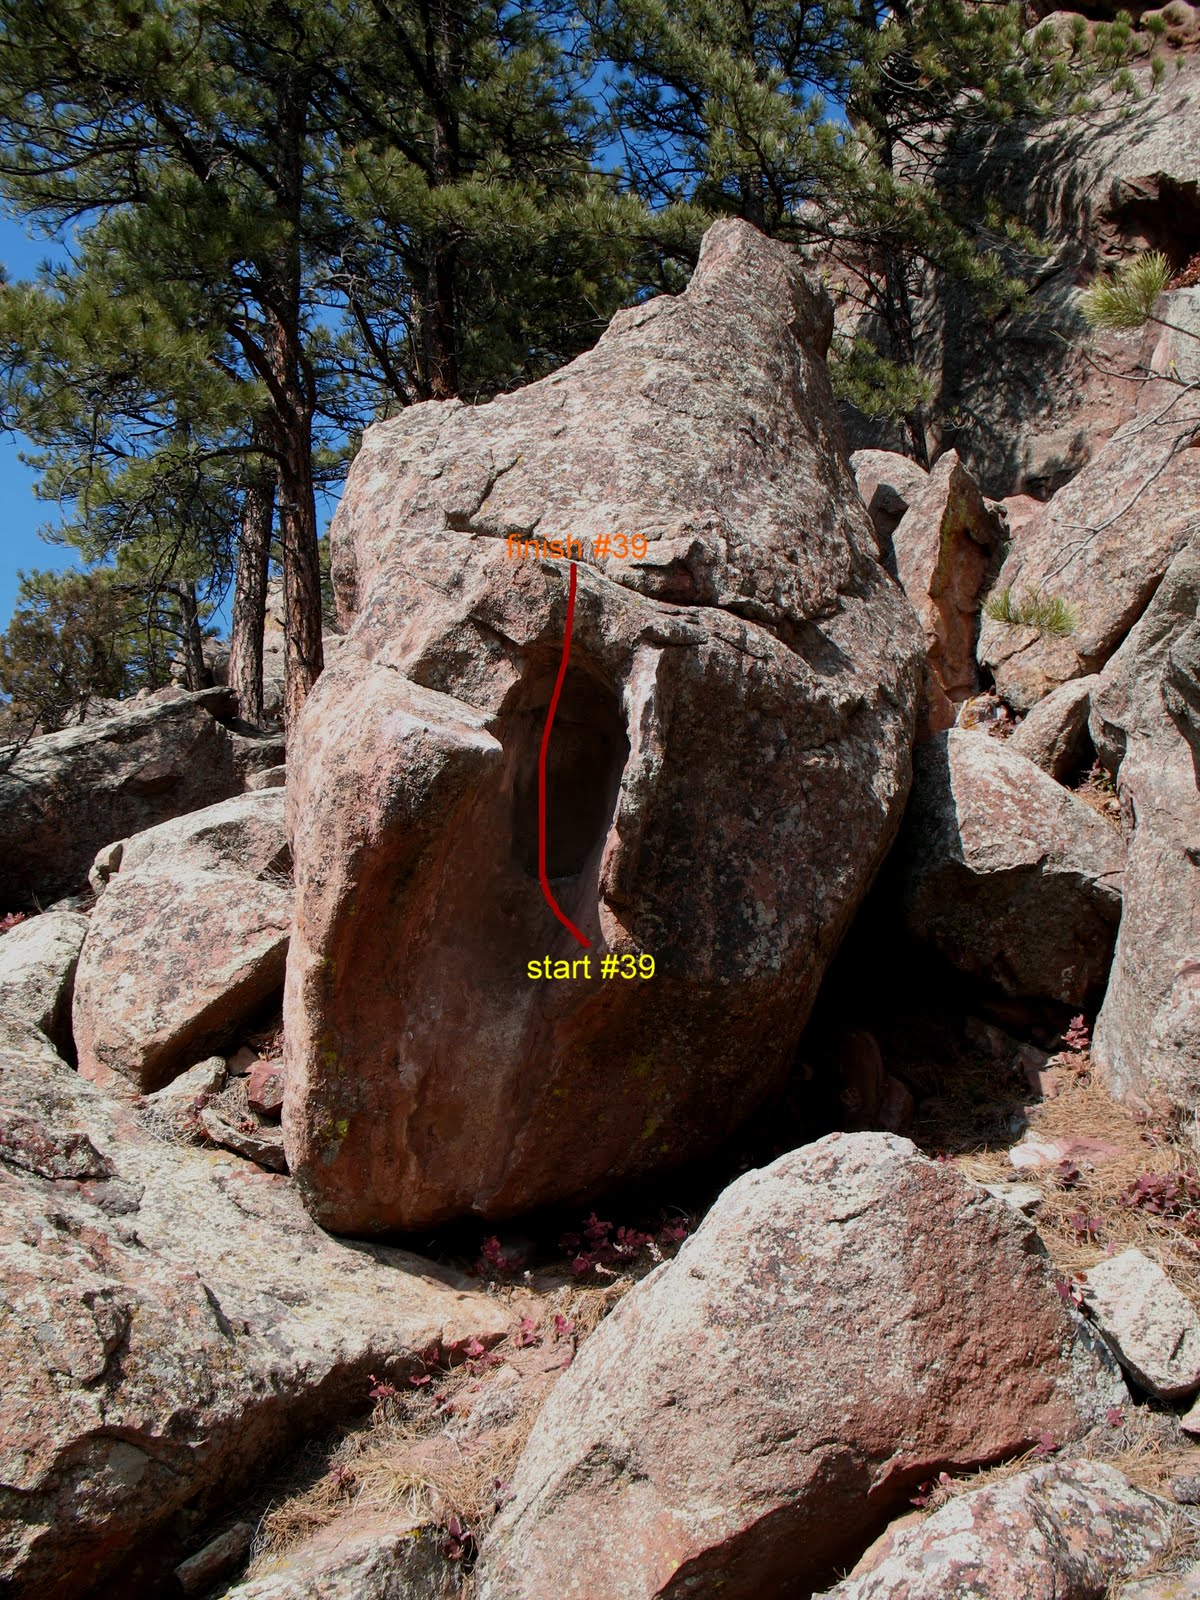
39. Chicken Wing V1 sds ... FA: Unknown
From a sds on the opposite and downhill end of the same boulder as #38, move up into a large weird hole and pull up onto the top.
40. Pride and Prejudice V0/1 ... FA: Chip Phillips, 2002
On the large formation twenty feet to the east of #39, ascend the south-facing side up and left to the arête via incut edges to a ledge at 16+ feet. A couple reaches are necessary, but the holds are all there. Walk off the ledge to the left.
41. Pockets of Little Resistance V0 X ... FA: Chip Phillips, 2002
From the same start as #40, ascend the south-facing side up and right via a somewhat chossy seam to attain a good pocket system that takes you all the way to the top, at least 40 feet up. Keep it together up there amongst all the pockets.
CAVE HANG AND THE LION'S DEN
42. Cave Hang V0 ... FA: Rob Candelaria, 1974 *
This steep northwest-facing overhang is behind some talus boulders out of view just right of the Sunshine Slab and east of Prow Rock. Scramble over the talus and this problem is obvious. Start matched on the high jug and pull out the overhang on incut crimps and edges. This problem is a candidate for the best V0 on the mountain.
43. Cave Hang Direct V5 sds ... FA: Unknown
The sds to #42 that is of lower quality. Start low on a good RH edge and a LH sidepull-undercling. Your first move must be quick, as most of the options for feet consist of disintegrating ballbearings.
44. Ivy’s Vine V0 ... FA: John Ivy, 1976
Go under #42 and #43 out the bottom of the cave and turn left to reach the last two problems. Six feet left of #45, start high and climb out the bulging topout.
45. Pocket Prow V4/5 ... FA: Rob Candelaria, 1974
This problem climbs straight out the south-facing overhang above a cave starting at the obvious shoulder-high pocket that is good for the RH. The straight-up topout is not trivial and will have you battling.
46. Pocket Prow Direct V7 sds ... FA: Justin Jaeger, 2004
The sds to #45. Begin from a sds underneath the horizontal roof at a rail. You will need to pinch the rail to thrutch out the roof, attain the pocket and then finish up #45.
1. Toadstool VB sds ... FA: Unknown
This problem is located on by itself on the north side of chossy little boulder at the top of the short hill just before the tightly-knit pine trees. From a sds on the northwest side, climb the flaky northwest bulge up mostly jugs.
2. First Move VB ... FA: Unknown
Climb the short and easy northeast corner to the top.
3. Second Move V1 ... FA: Chip Phillips, 2002
Right of #2, begin on really poor starting holds (lots of pebbly-grips and a couple of slopey options), put a foot on a ledge and lunge straight up from from those same really poor holds to the incut lip and mantel it out.
4. Third Move V2 ... FA: Chip Phillips, 2002
Right of #3, ascend the west-pointing arête. Without using the small meddling boulders below to get started, do an awkward first move to start using a good RH on the arête and a really poor LH and continue to the top with a possible mantel finish.
5. Rabbit Hole V4 / V5 sds ... FA: Peter Jones, early 2000's
Find the arête with a boulder perched above it. Begin on good edges on the arête (a) or a sds below (b) and surf up and left on slopers until you can transition up onto the slabby east face of the upper boulder and go to the top.
6. Chess Board Left V0 sds ... FA: Peter Jones, early 2000's
Begin from a sds on two low holds. With good feet, surf the lip up and right to the apex of the boulder and pull over on jugs.
7. Chess Board Center V0 sds ... FA: Peter Jones, early 2000's
Begin from a sds on a thin LH sidepull and RH jug. Bump your LH up once or twice to better holds and pull over the top. Variation #1 - Jones Opening V? sds: A variation to #7 that uses the same LH sidepull and a opposing thin RH sidepull instead of the jug to start, which probably necessitates a high right heel-hook to start. A crouching start will be necessary unless you are tall with long arms or you have 2 or 3 pads to stack so you can reach the RH crimp from the sitting position.
8. Chess Board Right V0 sds ... FA: Peter Jones, early 2000's
Begin from a sds down low on the arête and make a few pulls up and left on good incuts to pull over the top.
9. Brickmason Traverse V2 sds ... FA: Peter Jones, early 2000's *
About 10 yards past #6-8 is a narrow north-to-south corridor with a slightly overhanging west face that almost appears to be the work of a brickmason. Start at the southern end and traverse uphill right to left up silky-smooth reddish bricks to the highpoint where you can topout on jugs. A cool traverse on unique rock.
BACKSCRATCHER CORRIDOR
10. Backscratcher V2 sds ... FA: Chip Phillips, 2002
From the above problems, backtrack out of the little boulders into the tightly-knit pine trees and walk south 20 yards. This corridor is located one level below and west of the Fingers Boulder Corridor. With a jagged-limbed bush right behind you and ready to impale you if you fall, ascend this west-facing bulge to the top from a sds.
11. Backscratcher Crack VB ... FA: Unknown
Five feet right of #11, climb out the obvious wide crack that is almost a chimney.
FINGERS BOULDER CORRIDOR
12. Rounded Prow VB ... FA: Unknown
Twenty yards before you arrive at the Fingers Boulders proper, look for a tall rounded prow. Climb straight up it on sloping high-friction sloping edges.
13. Sloping Jugs VB ... FA: Unknown
Eight feet right of #12, climb large sloping high-frcition jugs just left of a large tree.
14. Finger Arête V2 (a) / V4 sds (b) ... FA: Unknown *
The name is a misnomer, as this is not an arête problem. Start on opposing layaways (a) and climb the short face left of #15. A sds begins below on opposing sidepulls (b) and bumps the grade.
15. Fingers Fingers V1/2 sds ... FA: Unknown
Climb the short finger crack from a sds at the base of the crack to good holds at the top.
16. Right Finger V3 ... FA: Unknown
A few feet right of #15, pull on at the thin finger-slicing edge, slide left a couple feet and topout over the bulge.
17. Right Finger Direct V7 sds ... FA: Justin Jaeger, 2003 *
From an obvious sds 8 feet right of the crack at a jug below the start for #16, move up into #16 via a match on or crossover from a thin finger edge. At first glance, this one appears deceivingly easier than advertised.
18. Finger Free V3 ... FA: Peter Jones, early 2000's
Around to the right from #16 and #17, traverse the somewhat lichenous arête/lip to the left for about 12 feet, then top out where #16 and #17 do.
HUECO HANG
19. Hueco Hang Left V0 ... FA: Unknown
No hueco's here, although there are some on the overhang looming above. Surmount the short bulge up to a ledge at the vertical crack.
20. Hueco Hang Right V2 ... FA: Unknown
No hueco's here either. About 15 feet right of #19 and just right of a small leaning pine tree, surmount a bulge up onto a ledge.
THE RAMP
21. The Ramp V1 ... FA: Rob Candelaria, 1974 *
A contender for the best slab problem on the mountain! Ascend the slick low-angled grey slab just left of The Jug for about 24 feet using pebbles, pockets and thin edges. When you arrive at a bit of a stance with good hands, step right onto a ledge behind the topout for The Jug problems.
THE JUG
22. Legacy of the Kid V4 ... FA: Rob Candelaria, 1974 *
Just right of #21, climb the vertical left side of the red streak to huge incut edges. Continue straight up the left side of the high prow on good holds, then exit transition onto the top via miniscule crimps and an armyman-crawl topout at 24 feet. This one is very committting on thin topout holds with little chance for retreat. At a minimum, I highly recommend scoping out the topout first. Bravo Rob!
23. Red Streak V1 ... FA: Rob Candelaria, 1974 *
Climb the right side of the red streak to the incut edges, then go up and right on enormous jugs to top out with #24.
24. Right Red V0 ... FA: Rob Candelaria, 1974 *
Start a few feet right of #23, but finish on the same holds. Almost as fun and good as its neighbor.
25. Southwest Prow V1/2 X ... FA: Unknown
Start at a large undercling down in a hole at the base of the southwest corner about 10 feet right of #24. Do a couple of hardish moves to get started, then climb the line of least resistance 25+ feet up the low-angled prow to the top. A couple of spots will force you to think and it's along way down to the talus, but it's all there and the very top is quite juggy.
26. Southwest Face V1 X ... FA: Rob Candelaria, 1974
Twelve feet right of #25 up on top of a platform of sorts, this low-angle problem ascends pebbles, edges and pockets amongst the lichen for 20+ feet above a slot and talus block landing. There are lots of different ways one could climb this slab, although there is a fairly direct line to the top in the middle.
MUFFET ROCK
27. Muffet Rock Traverse V1 sds ... FA: Unknown *
Begin from a sds low on the right and traverse up and left for 15+ feet. At that point, go to the top on huecos and edges. There is a large 1000 lb teetering block 15 feet up and right from the start of this problem, so stay the hell away from it on the descent.
28. Muffet Rock Direct V1 sds ... FA: Unknown
Begin from a sds with #27, but after about 5 feet ascend two bulges to the top at an obvious weakness. There is a large 1000 lb teetering block 15 feet up and right from the start of this problem, so stay the hell away from it on the descent.
SUNSHINE SLAB
29. Bush Route V0 X ... FA: Unknown
Left of #31 about 10 feet, climb straight to the high ledge 40+ feet up passing a ledge and a small dead tree on your left.
30. Reverse Inner Earth Traverse V1/2 ... FA: Rob Candelaria, 1975
Traverse left to right across the length of the Sunshine Slab, finishing up #36 or at the far right hand end of the wall.
31. Aerial Ballet V0 X ... FA: Unknown *
Start up a well-featured section of holds to a stance, then venture up small pebbles and edges to the high ledge 40 feet up. If you like committing slabs, this finishing sequence is for you. See also the next 4 problems.
32. Difficult Route V2 X ... FA: Rob Candelaria, 1974
A few feet right of #31, climb gently up the face to the high ledge 40 feet up using edges and pebbles that may be difficult to trust.
33. Michael’s Face V2 X ... FA: Jim Michael, 1975
Ascend the line that begins directly behind the tree and climbs straight to the high ledge 40 feet up.
34. Ament Face V2 X ... FA: Pat Ament, 1975
Just right of the tree and #33, climb straight to the high ledge 40 feet up.
35. Aesthetic Face V1 X ... FA: Unknown
A few feet right of the tree, climb straight to the high ledge 40 feet up.
36. Nubbin Wall V0 ... FA: Unknown *
Climb solid pebbles and nubbins up to a small ledge 15+ feet up. Now downclimb the problem, although it is also possible to traverse right and head down there.
37. Inner Earth Traverse V2 / V2 X ... FA: Rob Candelaria, 1975
Traverse right to left across the entire length of the Sunshine Slab. Stop at the end or head for the top with #29.
PROW ROCK
38. Prow Overhang V4 sds ... FA: Unknown *
From a low sds on the north corner of the boulder, use closely-spaced crimpers to bump your way up to the top of the prow and pull over. Short, but otherwise perfect.
39. Chicken Wing V1 sds ... FA: Unknown
From a sds on the opposite and downhill end of the same boulder as #38, move up into a large weird hole and pull up onto the top.
40. Pride and Prejudice V0/1 ... FA: Chip Phillips, 2002
On the large formation twenty feet to the east of #39, ascend the south-facing side up and left to the arête via incut edges to a ledge at 16+ feet. A couple reaches are necessary, but the holds are all there. Walk off the ledge to the left.
41. Pockets of Little Resistance V0 X ... FA: Chip Phillips, 2002
From the same start as #40, ascend the south-facing side up and right via a somewhat chossy seam to attain a good pocket system that takes you all the way to the top, at least 40 feet up. Keep it together up there amongst all the pockets.
CAVE HANG AND THE LION'S DEN
42. Cave Hang V0 ... FA: Rob Candelaria, 1974 *
This steep northwest-facing overhang is behind some talus boulders out of view just right of the Sunshine Slab and east of Prow Rock. Scramble over the talus and this problem is obvious. Start matched on the high jug and pull out the overhang on incut crimps and edges. This problem is a candidate for the best V0 on the mountain.
43. Cave Hang Direct V5 sds ... FA: Unknown
The sds to #42 that is of lower quality. Start low on a good RH edge and a LH sidepull-undercling. Your first move must be quick, as most of the options for feet consist of disintegrating ballbearings.
44. Ivy’s Vine V0 ... FA: John Ivy, 1976
Go under #42 and #43 out the bottom of the cave and turn left to reach the last two problems. Six feet left of #45, start high and climb out the bulging topout.
45. Pocket Prow V4/5 ... FA: Rob Candelaria, 1974
This problem climbs straight out the south-facing overhang above a cave starting at the obvious shoulder-high pocket that is good for the RH. The straight-up topout is not trivial and will have you battling.
46. Pocket Prow Direct V7 sds ... FA: Justin Jaeger, 2004
The sds to #45. Begin from a sds underneath the horizontal roof at a rail. You will need to pinch the rail to thrutch out the roof, attain the pocket and then finish up #45.

1 comment:
Did a nice R to L traverse across the Fingers formation. Start sitting on the far right at a short corner with an obvious set of crimps and head left to finish up the crack. V6 or 7?
Climbs really well.
Post a Comment