


UPPER Y WALL
1. Far Left Seam VB ... FA: Unknown
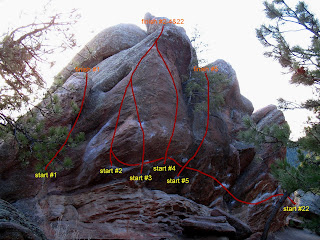
On the far left end, ascend the short flaring crack between the right-leaning pillar and the main wall.
On the far left end, ascend the short flaring crack between the right-leaning pillar and the main wall.
2. Left Arête V1 ... FA: Unknown *
Begin on the rounded arête on the left side of the wall and surf laybacks and edges on the arête to a high finish on positive slopers.
3. Left Side V1 ... FA: Unknown *
Almost at the left end of the wall, dynamically bust out the bulge on good edges and jugs, joining the arête and #2 for the high finish on slopers.
Almost at the left end of the wall, dynamically bust out the bulge on good edges and jugs, joining the arête and #2 for the high finish on slopers.
4. Center Left V3 ... FA: Rob Candelaria, 1974
Begin below the small fir tree growing out of the wall 12 feet up and - with the left talus boulder directly behind you - climb a thin and frustrating section on small holds to establish on the face left of the tree. Continue up and slightly left on face holds, committing to the finish with #2 and #3 at the top.
Begin below the small fir tree growing out of the wall 12 feet up and - with the left talus boulder directly behind you - climb a thin and frustrating section on small holds to establish on the face left of the tree. Continue up and slightly left on face holds, committing to the finish with #2 and #3 at the top.
5. Center Right V1 ... FA: Bob Culp, early 1960’s *
Start below the huge embedded cobble and fir tree growing 12 feet up. With the right talus boulder behind you, do a big move to an incut edge. Continue up to the ledge staying right of the tree.
6. Vision Quest V4 ... FA: Chip Phillips, 2008 *
Start below the huge embedded cobble and fir tree growing 12 feet up. With the right talus boulder behind you, do a big move to an incut edge. Continue up to the ledge staying right of the tree.
6. Vision Quest V4 ... FA: Chip Phillips, 2008 *
Just right of #5 is an obvious line that required extensive cleaning of friable edges to make it climbable. What remains is proud and fun, although the large meddling talus boulder in the landing area below certainly takes away from the problem. The best holds are down low and the dynamic crux to a decent hold comes quick. After that, a series of thin edges take you on a beeline to the top. Due to the talus boulder below, which presumbly explains why this line has been ignored, it is virtually impossible to fully guard against injury if you fall, so don't fall.
7. Merge Left V5/6 ... FA: Unknown *
Find the thin seam that starts 10 feet up. Down and left of this is an obvious incut. Start matched there and reach/swing/dyno up and right to the sloping shelf just right of the seam. Once you've matched the shelf, another long reach and/or mantel is waiting for you as you pull up top.
8. Merge Right V4 ... FA: Unknown *
Start on good holds next to #9, but get the last incut edge on the ovarhang with your RH and swing hard up and left to the sloping shelf just right of the thin seam that starts 10 feet up. Once you match the shelf, a long reach and/or mantel will allow you to attain the top.
9. Y-Left V1 ... FA: Unknown *
Start next to #8, but climb straight up, pulling over onto the ramp on good edges near the top of the left arm of the “Y.” A proud and committing finish is possible out the high bulge, but I have no idea how hard it is. If you try it, do not fall or break any o fthe suspect-looking flakes.
10. Y-Crack Left V1 ... FA: Unknown
Begin at the base of “Y Crack” and surf the left arm of the Y up and left. When you reach the finish for #9, pull over there.
11. Splitting the Y V2 ... FA: Unknown *
Begin at the base of “Y Crack” and surf the left arm of the Y up and left. When you reach the finish for #9, pull over there.
11. Splitting the Y V2 ... FA: Unknown *
Begin at the base of “Y Crack." Stand up in the dihedral via a RH layback to split the Y and climb straight up and over three bulges for a total 30+ feet of climbing to the top. This one is really good highball fun, with a momentary pause at the last bulge which makes you wonder a little.
12. Y-Crack Right V1 ... FA: Unknown *
Begin at the base of “Y Crack" and surf edges on the right arm of the Y. Join #13 on your way to top out with #14.
13. Y-Right Two V1 ... FA: Unknown *
Just right of the obvious “Y Crack” and left of #14 climb up and slightly right on juggy incut flakes. When you reach the right-arching arm of the Y, it gets a little thin before a long reach to top out with #14.
14. Y-Right V0 ... FA: Unknown *
No doubt about it, one of the top 3 V0s in Colorado. Climb the awesome line of incuts that take you 20 feet off the deck to a slopey topout ledge near the top of the right arm of the “Y.” Spectacular V0 fun.
15. Right Side Overhang X-Over V2 ... FA: Unknown *
Start 3 feet right of #14 and ascend numerous incuts and edges up to a long RH pull to a LH pinch/crimp. Twist up and right off this pinch/crimp to grab the top. For a dose of adventure/stupidity that I do not recommend, it is possible to head slightly left out the high overhang on loose flakes. Again, this alternative topout is not recommended.
16a&b. Right Side Overhang Reach V1 / V1/2 sds ... FA: Unknown
Begin on holds in the mini-dihedral at head height (a) or from an obvious sds below (b) that doesn't add much difficulty (b). Do a couple moves up good edges to a long reach to finish with #15. For a dose of adventure/stupidity that I do not recommend, it is possible to head slightly left out the high overhang on loose flakes. Again, because the rock quality is terrible, so this alternative topout is not recommended.
17a&b. Direct Mantel V2/3 / V4 sds ... FA: Unknown
Left of Pinch Bulge is an obvious sloping shelf. Start matched on the sloping shelf (a) and pull out the bulge, with a majority of folks skipping the mantel altogether and opting to use a good crimper or two just above the shelf to attain the top. A true 2-handed mantel on this shelf is substantially harder, probably V5 or harder depending on your manteling skillset. For full value on the sds below (b), go directly from the the sds holds to the mantel shelf (although the grade for this move is presumably reach-dependent) and continue to the top. Variation #1 - Upper Y Double Dyno V5/6: From the same sds, get both feet on and double dyno to the sloping ledge and continue to the top. A double dyno followed by a 2-handed mantel would be an excellent show of style.
Left of Pinch Bulge is an obvious sloping shelf. Start matched on the sloping shelf (a) and pull out the bulge, with a majority of folks skipping the mantel altogether and opting to use a good crimper or two just above the shelf to attain the top. A true 2-handed mantel on this shelf is substantially harder, probably V5 or harder depending on your manteling skillset. For full value on the sds below (b), go directly from the the sds holds to the mantel shelf (although the grade for this move is presumably reach-dependent) and continue to the top. Variation #1 - Upper Y Double Dyno V5/6: From the same sds, get both feet on and double dyno to the sloping ledge and continue to the top. A double dyno followed by a 2-handed mantel would be an excellent show of style.
18a&b. Pinch Bulge V3 (a) / V5 sds (b) ... FA: Unknown *
Start standing, matched on the incut flakey edge (a), or from a sds shared with #s 16b, 17b and 19 below (b) and swing up the the flakey edge. Match, then reach LH up and pinch the next slopey corner with your LH and move to the top using any of a vast variety of sequences to reach the top essentially following the vertical seam/crack to the ledge. Very popular.
19. Tall Man Shutdown V7 sds ... FA: Unknown
A difficult problem to describe and a good contrivance at best, but here goes ... From the same sds as #s 16b, 17b and 18b, swing up to the incut flakey edge. Once you've matched the flakey edge, only handholds right of the vertical seam are on, so crossover with your LH to a thin almost imperceptible edge on the highest sloping corner just right of the seam. FWIW, I get it as a pinch. From here, go up and right for the top using bad edges and slopers on the right face. It may be easier to be shown this problem, so ask around. Really cool moves, particularly when you have to uncoil from the crossover.
A difficult problem to describe and a good contrivance at best, but here goes ... From the same sds as #s 16b, 17b and 18b, swing up to the incut flakey edge. Once you've matched the flakey edge, only handholds right of the vertical seam are on, so crossover with your LH to a thin almost imperceptible edge on the highest sloping corner just right of the seam. FWIW, I get it as a pinch. From here, go up and right for the top using bad edges and slopers on the right face. It may be easier to be shown this problem, so ask around. Really cool moves, particularly when you have to uncoil from the crossover.
20a&b. Thin Crimp Bulge V4 (a) / V6 (b) ... FA: Unknown
Start on two small but decent layaways a couple feet right of the incut flakey edge. Move up to very thin but good crimpers just left of a tempting shelf. For V4 (a), get your right foot up on a good edge/horn and blast for the top without the benefit of the high shelf out right. For V6 (b), off-route both the high shelf and the good foot edge/horn that is so useful for the V4 version.
21. The Far Right is All Wrong V8 sds ... FA: Sacha Halenda, 1998
Begin from a sds just right of the sit-start holds for #16b, 17b, 18b and 19 and down below the start holds for #20a&b, and go up to the two decent layaways that represent the start holds for #20. Now finish up #20b, off-routing the high right shelf and the good foot edge/horn. I know ... contrived, but the rock is pretty good here making it worthy of inclusion.
22. Upper Y Traverse V3/4 (a) / V5/6 (b) ... FA: Unknown *
This traverse is presumably second only to the Monkey Traverse in popularity. Traverse the west face of the Upper Y Wall from the very far right to the very far left, finishing up one of the VFUN lines on the far left (#1-3). I like to finish up #2, but pick your own poison and hang on 'til the end. For the easier version (a), everything is on for the first 30 feet or so. For the harder version, stay on the lower edges and slopers until you join the higher and easier line in the shallow dihedral in the middle of the wall. Doing this back and forth adds pump and depending on your choice of holds and how and where you choose to finish probably adds 1 to 3 V grades.
23. The Fin VB sds ... FA: Unknown
This problem has been unknowingly seen by thousands of folks looking for a quick place to pee. If you are still interested, look in the alcove around to the right from the main Upper Y Wall. Begin from a sds on the horizontal fin and pull up and over this short beginner problem.
HALLOWEEN SPIRE AREA
24. Project V?
A direct start to #25 that is obvious but presumably passed on due to the horrific landing and the couple of hard moves required to climb into #25.
25. Happy Halloween V2 ... FA: Chip Phillips, 2002 *
Start on the right side of the tall black, orange and yellow spire and make a long reach left into the seam. From there, boldly climb to the top above a positively horrific landing area. Add a direct start (#24) for a presumed first ascent.
Start on the right side of the tall black, orange and yellow spire and make a long reach left into the seam. From there, boldly climb to the top above a positively horrific landing area. Add a direct start (#24) for a presumed first ascent.
26. Warm-Up Traverse V0 ... FA: Unknown
On the left side of the fir tree, about 20 yards left of Little Sloper Boy, traverse left across juggy holds. Back and forth is even more fun.
THREE OF A KIND WALL
27a&b. Little Sloper Boy V1 (a) / V3 sds (b) ... FA: Unknown
From good holds a few feet left of The Face, move up to the good edge 10 feet up, then trend slightly left up the face to the top. An awkward sds (b) begins on thin crimps below and adds a bit of difficulty.
28. Sloper Boy –> Face Link-Up V1 ... FA: Unknown *
Start up Little Sloper Boy. From the incut edge 10 feet up, slide right 5 feet to the big pocket on #29 and top that out. Impure wandering on moderate and fun terrain.
29a&b. The Face V3 (a) / V5 sds (b) ... FA: Unknown *
The stand (a) is a classic straight-up face problem that starts with your RH gastoning on the edge reattached with gobs of epoxy in the late 1990's. After the first 3 or 4 moves, the problem eases up substantially for fun pulling to a toput at about 22 feet. For the sds (b), begin from a sds matched on the remains of an obvious jug that broke in March 2010 and bust hard right to the epoxied edge before continuing to the top. This problem is constantly chalked and its popularity, for good reason, is no secret.
30a&b. The Rib V4 (a) / V5 sds (b) ... FA: Unknown *
Begin via either start on #29. From the horizontal edge about 10 feet up, zoom up and right below the obvious vertical rib, continuing to the top laying back the rib with your left hand. Two crimps right of the prow higher up, one sporting a tooth, precede the highball and exhilarating finish.
31. The Rash V6/7 ... FA: Greg Jones, late 1990’s *
Start LH on the epoxied hold at the base of #29. Move up into a LH gaston undercling, then to a RH edge/sloper before pulling the bulge up and slightly left. This goes without using the very tempting vertical rib up high that is so useful and reassuring on #30 by pimping small crimps and edges on the slabby face, but to say the rib is "off" takes away from the problem and the climber risks a serious rash AND MORE if something blows up there. Be safe!
32a&b. The Chisel Route V6/7 (a) / The Jizzler V7 (b) ... FA: Christian Griffith,1980’s & Colin Lantz, late 1990's
For The Chisel Route (a), start LH on the epoxied hold at the base of #29 and RH on a thin crimp. Move up into a LH gaston undercling, then up to a couple of edges/slopers before a long RH move up and right to a hidden sloper and the highball finish up the face next to/in the seam. The Jizzler (b) off-routes the epoxied hold at the start. Get into the gaston from a truly crappy set of crimps and ascend #32a. The grades on these may be a bit sandbagged as holds have broken, weathered and crumbled over the last 10 years. Bring a whole slew of pads.
33. Kaptain Face V5 ... FA: Neal Kaptain, 1985 *
33. Kaptain Face V5 ... FA: Neal Kaptain, 1985 *
Begin matched on a funky sidepull/undercling at the bottom of a small left-facing dihedral and battle up to the good edge 10 feet up. From the edge, climb straight out the high bulge using hard-to-see sloping edges and an obvious high tooth to the top. If you must ask, the round pebble out right that is the namesake of the next problem is off.
34a&b. Round Pebble AKA The Culp Route V4 (a) / V3 (b) ... FA: Bob Culp, early 1960's *
There are 3 starts for this one, the first two of which are described here (see the next problem for the third). For V4 (a), begin as for #33 matched on the sidepull/undercling and battle (crux) up to the good edge 10 feet up. For V3 (b), start on opposing sidepulls and do dynamic move up to the good edge. Now, reach right to the round pebble, then to a layaway in the bottom of the slot. Once you can stand up and layback the slot with your RH and get a good pebble on the face up high with your LH, it is pretty much over. Bring lots of pads if in doubt.
35. Breashears' Round Pebble V6/7 ... FA: David Breashears, mid 1970’s
A harder variation to #34 that avoids the good LH starting holds as well as the good edge out left 10 feet up, ascending the very thin right seam and miniscule edges on the face straight up to the round pebble and then to the top.
36. The Red Streak V5/6 ... FA: Skip Guerin, late 1980’s/early 1990’s *
Below the obvious red streak, just right of #35, get established on jugs with smallish feet, go RH to the first thin crimp up on the face, high-step, then go big with your LH to the next edge. From there, climb straight to the top up small edges and slopers. The angle eases up a little up there, so don't letthe small holds scare you away. The lip on LH edge broke off in 2005 making this one a tad harder, but it still goes and it is still glorious.
37. Colin’s Thing V6 ... FA: Colin Lantz, 1993/4 *
A variation to #36, but a really good one worthy of a separate entry. After establishing on the starting jugs and small feet, crossover with your LH to the first thin crimp, get your feet up and go RH to a tempermental sloper up and right that you need to get almost perfectly. Make a hard reach up and left to rejoin #36 and head for the top on smaller holds with easier moves.
38. High Flake AKA Crystal Delight V3 ... FA: Unknown *
From low and obvious starting holds below the finish for #44, move straight up to the flake system probably via a dynamic move. From the top of the flake system, regroup, then reach up and right for a knobby crystal, step right and carefully dance to the top. Really fun highballin'.
39. Slippery Slope V3/4 ... FA: Dave D'Epagnier, 1977 *
Where #44 starts to rise up the juggy flake system, pull on good holds and do a dynamic move up to a sloping edge on the bulge above. Match the sloping edge and discover a very subtle sloping lip. Now do a sketchy mantel or perch move up onto the sloping lip, before continuing up the face to the top. There is a half-moon crimp and a pebble up there to assist with the finish. Be aware that although I've never taken a bad fall on this one, it could have happened every time if my foot blew once I committed to the move up onto the lip. It is insecure up there and at least a couple pads and/or spotters are highly recommended.
40. Center Line V1/2 ... FA: Unknown
About 15 feet left of #42, start next to a thin vertical seam lacking obvious holds. Climb past 2 small embedded pebbles on your way to the top.
41. Ledge System VB ... FA: Unknown
About 8 feet left of #42, climb good edges and slopers to the top.
About 8 feet left of #42, climb good edges and slopers to the top.
42. The Groove VB ... FA: Pat Ament, mid-1970’s (one-armed)
Climb the obvious wide slot to the top. Doing it with one-arm is optional - ha!
Climb the obvious wide slot to the top. Doing it with one-arm is optional - ha!
43. Bulging Slab V0 ... FA: Unknown
Ascend the slab between the start of #42 and the end ofthe wall to the top.
Ascend the slab between the start of #42 and the end ofthe wall to the top.
44. Three of a Kind Traverse V3 ... FA: Unknown *
Surely the best traverse for the grade on the mountain. Traverse right to left from the far right (south) end of the wall to the well-chalked flake system that ends about 12 feet up in the middle of the wall. Continue to the top with #38 for style points.

6 comments:
Great page and site. I've used your beta photos on numerous occasions. To help the uneducated, a full-size version of the top and 3rd photo would be a choice addition to this page. What say?
At some point, I'll reload all the photos on the page, so that the 1st & 3rd photos can be blown up to full size.
I use to do route #39 all the time back as early as 1977. May have had the first ascent, but then again it may have already been done by then. Dave D'Epagnier.
Good beta Dave ... it's an inobvious line that had been ignored for a long time before I re-cleaned it, but I'm happy to give credit where credit is due. If you would like to re-name the problem, please do so.
I appreciate the input and suspect you could make other contributions.
Question - there are a couple of problems downhill from the beer barrel boulder. I'm not sure, but I don't think I saw them in your post or on MP.com. any guide?
Seth and Ted's Excellent Adventure v9: This climbs the entire left half of the Three of a Kind Wall. All foot and hand holds are on. Sting in the tail finish! FA: Seth Sanford and Ted Lanzano
Post a Comment